Barkácsoláshoz nem csak eszközök kellenek, de hely is. Az pedig a garázsban van. Márha tele van a garázs mindenféle junkkal kacattal, ami a helyfoglaláson kívül semmit nem csinál... viszont ki nem akarjuk dobni. Így alakult, hogy az első őszi project a garázsban egy munkaasztal és egy faliszekrény elkészítése lett. Nagyon-nagyon büszkék vagyunk a végeredményre. Igaz, hogy elég sok akadályba ütköztünk, de végülis megoldottuk a dolgot.
You need some space for making projects. Tools are not everything. And if you live in an urban environment, no shed or wood shop... then you are stuck in the garage. But the garage is full of junk and not an inviting space... so we tried to make it a little better and I think we succeeded.

You need some space for making projects. Tools are not everything. And if you live in an urban environment, no shed or wood shop... then you are stuck in the garage. But the garage is full of junk and not an inviting space... so we tried to make it a little better and I think we succeeded.

Hát nem egy benti projektre csábító látvány, ugye? Ezen változtatni kellett...
Not really an " I wanna do some projects here" scenery, is it?
Not really an " I wanna do some projects here" scenery, is it?

Először a munkaasztalt dobtuk össze. A tervek nagyjából megvoltak.
Plans for the workbench:
Plans for the workbench:

Úgyhogy nekiálltunk. A lábakkal kezdtük. 36 inch magasra terveztük, hogy a guruló szerszámosszekrény beférjen alá.
So we started... We planned the height of the bench to be 36" so the rolling cabinet would fit...
 |
| Úgy indítottunk, hogy a keresztgerendáknak nem volt jó a mérete és mindegyikből le kellett vágni 2 inchet... First thing was that we realized our side measurements don't add up... so we had to cut 2" off of every piece.. |

 |
| Úgyhogy elővettük a fűrészgépet és uzsgyi... We grabbed the chop saw and jumped right into it... |
Then the joints. We used our beloved Kreg tool. I think it was one of our best investments...


 |
| Oszi, az ellenőr, mint mindig... Oszi, the inspector, as always... |
Ezután az alsó polcot kellett beszabni. (Nem te vagy az egyetlen, aki bebaszni-t olvasott, haha) A sarkokat marógéppel vágtam le, hogy passzentos legyen.
Then we needed to cut the bottom shelf to size. I used the router to cut out the corners for the legs.


Jöhetett a festés. A szomszédaink mikor költöztek, kidobtak egy fekete polcot, amit inkább elkértem, mint hogy veszendőbe menjen, azt is lefestettem.
Painting... When our neighbors moved out, they wanted to throw away this bookshelf that I saved and now painted from black to white... Now that's a pain....


A tetejére egy pozdorja lapot fúrtunk, amire egy mosható, fél centis préselt lemezt ragasztottunk.
We used particle board for the top secured with screws then glued a sheet of hardboard on top of that.

Itt jött az, hogy már csak a pegboard-ot (egy lyukakkal ellátott lemez) kell felszerelni egy egyszerű kis keretre és kész. De G. kitalálta, hogy akkor már építsünk neki egy kis doboz keretet. De milyen jól tette. Ötlet ötletet követett, jöttek az ajtók, stb, akkor már csússzon az ajtó... Na a lényeg, hogy nagyobb project lett belőle, mint maga a munkaasztal. :)))
Now all what left was to make a 1x2 frame for the pegboard and hang it on the wall. But DH came up with an idea to build a boxed frame instead, That was the best idea... like... ever! From there we went to boxed frame with shelves then to doors, then sliding doors. Well it turned out to be a bigger project than the workbench itself. LOL


Then we needed to cut the bottom shelf to size. I used the router to cut out the corners for the legs.


Painting... When our neighbors moved out, they wanted to throw away this bookshelf that I saved and now painted from black to white... Now that's a pain....


We used particle board for the top secured with screws then glued a sheet of hardboard on top of that.

Itt jött az, hogy már csak a pegboard-ot (egy lyukakkal ellátott lemez) kell felszerelni egy egyszerű kis keretre és kész. De G. kitalálta, hogy akkor már építsünk neki egy kis doboz keretet. De milyen jól tette. Ötlet ötletet követett, jöttek az ajtók, stb, akkor már csússzon az ajtó... Na a lényeg, hogy nagyobb project lett belőle, mint maga a munkaasztal. :)))
Now all what left was to make a 1x2 frame for the pegboard and hang it on the wall. But DH came up with an idea to build a boxed frame instead, That was the best idea... like... ever! From there we went to boxed frame with shelves then to doors, then sliding doors. Well it turned out to be a bigger project than the workbench itself. LOL
Először megépítettük a keretet 6 incses fenyőből.
Boxed frame was the first to be built. We used 1x6 pine board. The cheapo kind.
Boxed frame was the first to be built. We used 1x6 pine board. The cheapo kind.

A fenyőbe (mind a 4 oldalába) az asztali fűrésszel vágtunk egy horonyt, amibe belecsúsztattuk a pegboardot. (Egyúttal kivágtuk az ajtóknak is egy szélesebb horonyt.)
We used the table saw to cut the groove into the side of the pine board where we later slid the pegboard. (we also cut the bigger grooves for the doors into the longer boards.)
We used the table saw to cut the groove into the side of the pine board where we later slid the pegboard. (we also cut the bigger grooves for the doors into the longer boards.)


Aztán jöhettek az ajtók. Szintén az asztali fűrésszel vágtunk horonyt a pegboardnak az ajtók anyagába. Majd levágtuk méretre a darabokat 45 fokos szögben.
Next we made the doors. Also with the table saw we cut grooves for the pegboard, then cut the pieces to size with a 45 degree angle.
Next we made the doors. Also with the table saw we cut grooves for the pegboard, then cut the pieces to size with a 45 degree angle.

Próba
Dry fit
Dry fit

Festés következett...
Painting...
Painting...

Polcok/Shelves


Aztán az ajtók összeszerelése...
Door assembly

Kreggel...


3 oldal után becsúsztattuk a pegboardot, majd jöhetett a 4 oldal csavarozása.
Slid the pegboard into the groove when 3 sides were screwed together, then finished up with the 4th side.

Ilyenek lettek:
This is how they turned out:
This is how they turned out:

Kis finomítás:
Touch up...
Touch up...


Polcok behelyezése:
Putting the shelves in...
Putting the shelves in...


Majd ajtó főpróba, szupeeeeeeer!!!!
Placing the doors into the grooves aaaaand: they FIT!

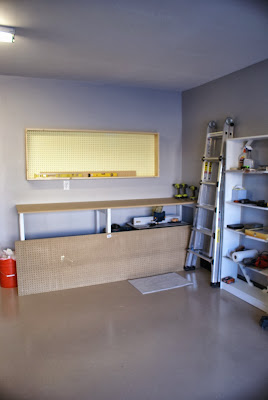
Ezután már csak fel kellett helyezni a falra a szekrényt és telepakolni...
All what left was to mount it to the wall and fill 'er up...
All what left was to mount it to the wall and fill 'er up...

Vettem egy csomó kis tárolóedényt, és 3 színű festék spray-t, majd elkezdtem feltölteni a polcokat...
ÍME:
I bought a whole lot of plastic storage containers and 3 cans of spray paint and here she is>
I bought a whole lot of plastic storage containers and 3 cans of spray paint and here she is>

Az ajtókat lehet húzni bárhová a kereten belül:
The doors slide all the way to either side of the box without resistance. I also wiped the groove with some candle wax so it slides like hot knife in butter :D

Imádom! :)))
I. LOVE. IT!
Az egytlen baja, hogy elmértem (én hibám, ahogy erre G. külön rámutatott), és így az ajtók, mikor össze vannak húzva, nem érnek össze, hanem van egy 5cm-es hézag... Annyi baj legyen, de többet ekkora hibát nem véthetek.
The only boo boo is that (as it was pointed out to me quite obviously by DH) that I messed up the measurements for the doors so when they are "closed" there is a 2 inches gap... Oh well, but I know not to EVER make a mistake like this again ;)


nagyon ugyesek vagytok. mindig szivesen olvasom az ilyen home improvement bejegyzeseiteket.
VálaszTörlésKoszi GG :) Nagyon elveztuk a barkacsolast :)
TörlésThe 2" gap in your wonderful garage sliding door cabinet can easily be remedied by attaching an astragal to one of the door edges :) I am considering building this myself - thanks for the inspiration!
VálaszTörlésThank you, Brian :) I'm good with it now, especially since I keep the doors open all the time :) please let me know if you build it, I would love to see it!
TörlésThank you, Brian :) I'm good with it now, especially since I keep the doors open all the time :) please let me know if you build it, I would love to see it!
Törlés